Recipes

blog-recipes-kick-off-game-day-tailgating-with-this-bbq-beer-meatballs-recipe
Kick-Off Game Day Tailgating With This BBQ Beer Meatballs Recipe
  Having the perfect tailgating food is key to the success during football season. Not everyone has time to cook crazy elaborate meals that use tons of equipment. Sometimes the best food is cooked using the most essential gear like this new BBQ Beer Meatballs recipe using the Stanley Adventure Full Kitchen Base Camp Cook Set. Armed with nothing more than a sturdy 18/8 stainless steel pot, pan, utensils and dishes, you can easily cook a tailgating favorite over the fire for your crew. This recipe utilizes almost every part of the Stanley Camp Cook Set, which starts with mixing the meatballs in the steel pot. After mixing the meat & seasonings, you will form the meatballs and place them in your Stanley Cooler to firm up for at least 20 minutes.  Next, you will use the stainless steel skillet to cook both the meatballs and the BBQ sauce that will go on top of them. This skillet can withstand all the heat from the fire on game day, so do not be shy when cooking with it. Oh and did I mention you will be cooking with beer? Make sure to fill your Stanley Classic Easy-Pour Growler and Classic Stay Chill Beer Pint before heading to the ‘gate so that you can drink cold beer while you cook. Once the BBQ Beer Meatballs have been dosed in the BBQ sauce, you can serve them up and store them in the Stanley Adventure Stay Hot Camp Crock to stay warm for later. Bonus points: pre-make the food and bring everything in the Vacuum Crock to the tailgate + another Growler for more beer with all the time you will save from pre-cooking the food. In the end, this recipe is simple, easy and packs a winning taste this fall. So go check it out below and make sure to gear up with the all-in-one Stanley Camp Cook Set. TAILGATE RECIPE: THE BEST BBQ BEER MEATBALLS Cooking Details Yields: 4 Servings Prep: 20 minutes Cook: 30 minutes   Meatball Ingredients: 1 lb. of Ground Beef ½ lb. of Ground Pork ½ lb. of Ground Bison 2 Eggs, whipped 4 cloves of Garlic, pressed 2 tbsp. of Chives 1 ½ tbsp. of Onion Powder ½ cup of Potato Chips, finely crushed Salt & Pepper, to taste Spicy Beer BBQ Sauce Ingredients: ½ cup of Ketchup 1 tbsp. of your favorite Hot sauce 2 tbsp. of Honey Splash of Beer, preferably a Marzen 2 tbsp. of White Vinegar 2 tbsp. of Butter  Instructions: In the large pot from the Stanley Camp Cook Set, add all your ingredients for the meatballs and mix thoroughly. Pull out a handful and make 1 ½ inch in diameter sized meatballs. Place in Stanley cooler for at least 20 minutes or until ready to cook. Preheat your fire to a medium-high heat. Add your Camp Cook Set pan over the fire 1-2 minutes before cooking. Add oil to the pan before cooking. Add meatballs to skillet and cook for about 4 minutes per side or until the internal temperature reaches 160F. Pull off meatballs and continue to cook until all meatballs are done. Once meatballs all meatballs are cooked and off, clean off pan and place back over fire. Deglaze using butter and a splash of beer. Stir and let simmer in skillet for 1 minute. Next, add all Spicy Beer BBQ Sauce ingredients to skillet and let simmer over medium heat till ½ reduced (about 7-8 minutes). Stir occasionally to prevent burning. Pull BBQ sauce off fire, pour over your meatballs and garnish with more chopped chives. Add any remaining leftovers to Stanley Vacuum Crock for later.   ABOUT DEREK WOLF I am the cook & creator behind Over The Fire Cooking. I love traveling the world and being inspired by how fire, food, and people come together.     
A Foraged Lunch With Aman Dosanj
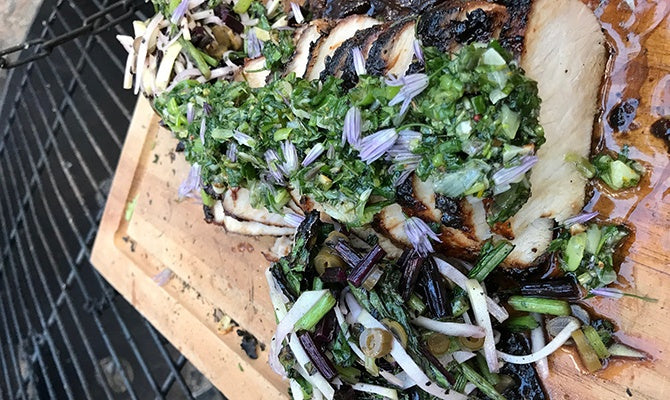
 Canada is not only a beautiful place, but a delicious place, too. When you take the time to really explore the land, you start to see things a tad differently. This summer has been edible adventure after edible adventure, and sometimes it's Mother Nature who gives me a helping hand when it comes to shouting lunch. Growing your own food or foraging from the land means you start to see the environment as the delicious place it’s supposed to be. Knowledge is definitely power here, but when you know what’s edible and more importantly, what’s not, supporting local and in-season doesn’t necessarily mean more expensive. For me, this is what having a sense of place and taste of place is all about and there’s also something really satisfying about working for your food. So, I like to leave the recipes aside and just do what feels right – tasting and adjusting as I go along until it tastes, well, delicious! There’s something about cooking over a campfire and real food just tastes so much better. Now, everywhere I look and every place or province I head to, there is something new to learn and feast on during our ever-changing seasons. Even though you never quite know what Mother Nature will have on her fresh sheet, one constant thing is that I have my Adventure Insulated Camp Bowls (32 oz and 18 oz) to hand for all the unexpected goodness to come. From wild asparagus, pine and spruce, rose petals, sumac, lamb’s quarter, pineapple weed, tarragon, mustard greens, to yarrow Labrador tea, fire weed and lot and lots of poison ivy and the occasional bear spotting all of which (minus the poison ivy and you want to dodge the bear) magically edible. With all the food stimulus around me, it doesn’t take long for me to bust out the old camp stove and Adventure All-In-One Two Bowl Cookset and set it down under a tree along the river trail or beside my tent. It is only until you unload your haul do I ever realize the extent of what Mother Nature can gift us. And then it was my turn to add a little Indian vibe and create some new food memories. Since leaving restaurant life and the perfections that go with it, I created my own little path in food with pop up dinners across the Okanagan Valley. For me, eating in season and supporting local growers means that you need to celebrate the imperfections of it, too. That pretty much translates to the fact that I make things up based on what I find and riff on where I am. Recently, one of my favorite things to make has been a super easy salsa verde. Foraged Salsa Verde Ingredients: Spruce Tips and/or Pine Needles (these give you a fresh citrus note, especially if you bash them) Fireweed Clover Dandelion Tops and Leaves Strawberry Flowers Charred Garlic Clove (minced) Charred Green Onion and Green Tops from my camp pantry Olive Oil Vinegar or Pickle Brine Salt and ground Black Pepper (to taste)   Instructions: Tip: forage from clean places away from roads and potential pee Wash, then dry all your foraged greens Chop all the foraged things until fine and add to one of your Adventure Bowls Add in a glug of olive oil (or rendered animal fat if you’re hunting) and mix Taste and adjust the acidity with seasoning with vinegar or pickle brine or lemon/lime juice (whatever you have), as well as salt and black pepper Serve with glazed pork (which is what I decided to do), spiced steak, or on top of your camp tacos Leave No Trace Chicken Soup (Serves 2 People) Leave no trace is kind of ingrained in you when you go outside to play. I hate wasting things, so I’m always thinking about how I can use what’s left and camping is no exception. Ingredients: Leftover Onion Peel from 2 large onions Leftover Garlic Peel 2 Garlic Cloves 2-3 Leftover Chicken Bones from chicken thighs or wings or whatever you have   Instructions: Start by charring the onion peel, garlic peel, and garlic cloves Once charred, add 500ml of water over the campfire. Bring to a boil, then let simmer for 2 hours to make a stock Cool and leave in your Adventure Cold For Days Outdoor Cooler   The next day, add the following to the chicken stock: ½ Onion (chopped) 1x Red Potato (small dice) Salt or Soy Sauce to season Green Onion Tops   Instructions: Re-heat the stock and reduce down, then add the onion and red potato Once the potato is cooked, add the green onion tops (you don’t want to do this too soon as green things in soups will go mushy) Taste and adjust seasoning with salt or soy sauce If you have leftovers, you can keep it warm inside a Vacuum Bottle or take it on an adventure with you Mother Nature really does have your back. Just remember that the land is borrowed, so don’t forget to share with the other members of our little eco-system and leave enough behind. Happy eating!      ABOUT AMAN DOSANJ Food geek, marketing geek, former England footballer (soccer), people watcher, middle child, Slow Food Member, adventurer, imperfect environmentalist, storyteller, and just weird enough to be interesting. The former Western Living Magazine ‘Foodie of the Year’, organizes pop up dinners and collaborative events across the Okanagan (Canada) aimed at bringing the community together. The Paisley Notebook was the winner of the ‘Culinary Tourism Experience’ category at the 2018 Canadian Tourism Awards, and a two-time finalist in the BC Tourism Industry Awards' 'Remarkable Experiences' category, and has raised over $47k for local charities since 2017.
4 Simple Car Camping Cocktail Recipes
Let’s start this whole story by just saying, I’m a beer guy. But, sometimes when I’m in the woods, especially traveling by foot or bicycle, cocktails are definitely the way to go. Lugging cans in and out of the woods is taxing and often times messy. When you bring a little hooch along, it’s a much different story. Secondly, I like drinking whiskey neat, it’s about the only hard alcohol that I can tolerate/enjoy without anything else. So naturally my go-to is whiskey but I can get down with a little gin from time to time as well. Third, while car camping is a lot of fun, there’s a lot of things you have to haul with you. If you’re limited on space and/or on budget, you may want to opt for simple car camping cocktails. Don’t let the name fool you. Simple cocktails don’t to be a bore. You can make easy and affordable cocktails that are delicious to down, without taking up too much room in the cooler or breaking the bank. If you need a little adult beverage after a long day of mountain biking or trekking through the forest, here are 4 of my favorite “cocktails” to drink while camping.   CHEAP CAR CAMPING COCKTAIL RECIPES The Good Ole Kentucky Mule. (Fancy Name For Whiskey Ginger IMO) Ingredients Ginger Beer Lime Whiskey (or bourbon) Ice In a traditional Kentucky Mule recipe, the copper mug will be the first ingredient. In my opinion, it seems a little bougie to reserve this drink for one vessel, especially since it doesn’t even keep the drink cold. I like to bring along the Stanley Adventure Happy Hour Cocktail Shaker Set for all my camping adventures. My favorite feature about this cocktail shaker is the removable reamer to juice your lime. I start by juicing, then add the ginger beer, and lastly the whiskey/bourbon to taste. No need to shake this one, I add ice to the cup or go sans ice. (I’m a fan of pre-chilling the shaker in the cooler) I find the pouring the drink back through the lid with the reamer still in the shaker helps by adding even more lime flavor and strains out the extra pulp. Voila, a fancy cocktail in the woods. The Gimlet Ingredients Simple Syrup Lime Gin Gimlets are simple and to the point. No need to beat around the bush late at night around the fire, just pour up a little gin mixed with simple syrup (in my case I just use sugar and a stick/knife to mix) and garnish with a lime. These are usually my go-to later in the evening, quick and easy. Whiskey & Skratch Ingredients Skratch Labs Exercise Hydration Mix Whiskey This one might throw some of you for a loop but I dare you to try it. When you’re out in the wilderness it's tough to carry much. I discovered my “love” for this when I was on a 4-day bike-packing trip through remote Idaho. We had whiskey and we’d stopped for a few beers whenever refueling but in the middle of BFE between Stanley and McCall, there’s not much. That said, who in their right mind sits in a hot spring after 100 miles in the saddle without a bevy. So we opened up the whiskey. As it got colder that evening, a nice hot drink sounded right. Experimentation began. Whiskey and hot water? Meh. Whiskey and hot Skratch Labs? We were on to something. This trip we had apple cinnamon Skratch and sadly they seem to have done away with that flavor. Since then I’ve moved on to the orange flavor. It hits the spot just the same but if anyone reading this has a bulk stash of apple cinnamon, please call me. Next time you’re planning to be really out there, bring along some Skratch and Whiskey, you won't regret it. “Black Butte Amuse” Coffee And Black Butte Porter Ingredients Porter beer Coffee I told you at the beginning that I’m a beer guy. I’ve been known to have a little beer with breakfast when camping and this drink makes the perfect excuse to. Not only is it bomb, but it’ll help you get rid of those last few dark beers in the cooler/fridge that no one seems to pick first. I usually do 2 parts black butte and 1 part coffee. Deschutes recipe will call for cold brew but I enjoy this hot. If you bring along a Stein then you can fit a whole black butte and top it off with coffee. Try it your next morning in the woods, you’ll thank me later. These are my favorite simple car camping cocktail recipes. You can definitely get a whole lot fancier but these should facilitate good conversation by the fire for hours! Need more cocktail ideas, try one of our 3 refreshing whiskey cocktails for summer.    ABOUT GRAFTON I'm a #raddad, bicycle mechanic, photographer and lover of everything the Western US has to offer. You can find me on two wheels, skiing, or knee deep wading in the river. My hands are always greasy and I'll do whatever it takes to keep on playing in the dirt.
Easy Camping Dinner Idea: Simple Campfire Jambalaya
There are not a lot of one-pot meals that feed a large crowd quite like Campfire Jambalaya. This traditional Creole dish is a fantastic blend of seafood, spicy sausage, rice, and flavor. But do not be intimidated, you can easily make this at the campsite with Stanley.  WHAT IS EASY CAMPFIRE JAMBALAYA? Jambalaya is a dish from Louisiana that is a mix and match of delicious odds and ends from the kitchen. You first start with the proteins. For my Jambalaya recipe, I added chicken thighs, andouille sausage, prosciutto, and shrimp. While this is my favorite blending, you feel free to add what you like! Use chicken breast instead for less fat or leave out shrimp if you don’t like seafood. It is your call. The flavor will be the same! Next is the veggies. You can’t talk Jambalaya without the holy trinity: celery, bell peppers, and onions. This is where the base of the flavor really comes from. Make sure to get some high-quality veggies as this will make sure the flavor from start to finish is perfect. Up next is the liquids and seasonings. This includes: Tomatoes Chicken broth White wine Creole seasoning (I recommend finding a local creole seasoning blend so you can taste something from the community, but if you cannot find anything then your local grocery stores should have a great selection) Creole seasoning is spicy and earthy. It is fantastic on shrimp and chicken by itself! I also recommend getting some that do not have salt so you can add that in by yourself. Lastly, you have rice. Long grained white rice is a fantastic rice for the dish. Once you add that into the pot, get ready for a good time! Let's Get To Cookin’ The cooking is actually pretty straight forward. To not let the daunting ingredients list fool you into thinking this is difficult. First, you will brown the proteins (without the shrimp). Next, you brown the veggies. Then you add the liquids, seasonings, proteins, and rice. You let that simmer over the fire till the rice becomes tender. The only last part is adding the shrimp at the last 5 minutes. Once those are steamed you are ready to eat! Making Jambalaya At The Campsite Or At Home? This is a simple recipe to make at the campsite. If you are RV'ing or Car Camping, bring along the Base Camp Cook Set and build your fire. It is a fantastic dish to get the kids involved in prepping and watching you cook. If you are hiking or going for a picnic, then maybe cook at home and put it in the . It will help to keep the food nice and warm while you are traveling! Either way, you cannot go wrong. Easy Campfire Jambalaya Recipe  Cooking DetailsYields: 4-6 ServingsCook: 90 minutesPrep: 30 minutesEquipment: Stanley Camp Cook Set & Stanley Vacuum Crock Simple Campfire Jambalaya Ingredients: 2 Chicken Thighs, cubed 1/2 cup of Andouille sauces, sliced 1/4 cup of Prosciutto, sliced 1/2 lb of Shrimp, seasoned with Creole 1/2 Onion, diced 1 Green Bell Pepper, diced 4-5 Celery Stalks, diced 6 oz Tomato Paste 1 1/2 cups of Crushed Tomatoes 2 1/2 tbsp of Creole Seasoning 2 Bay Leaves 2 cups of Chicken Broth 1/2 cup of White Wine 1 1/2 cup of White Rice Chopped Parsley, to garnish Oil, as needed Instructions: Using a fire starter and some local wood, start your fire. Make fire a medium heat. Place your grill directly over the fire and preheat Stanley Skillet and Pot from the Stanley Camp Cook Set. Add oil to both pans first. Add chicken to pot and sausage + prosciutto to skillet. Let cook for 3-4 minutes until browned and fully cooked. Pull all meat off and set aside. Pull skillet off and place the pot back over the fire. Add to the pot the celery, bell peppers, and onion to brown. Stir frequently. Once browned, add tomato paste, crushed tomatoes, creole seasoning, bay leaves, chicken broth, white wine, white rice, and cooked meat. Stir, cover and let simmer over the fire until the rice is soft (about 1 hour). Make sure to stir occasionally to prevent burning on the bottom. Once done, open up and place seasoned shrimp on top. Cover and let cook until shrimp become white (about 3-4 minutes). Pull the pot off the fire, garnish with parsley and serve. Make sure to add leftovers into Stanley Vacuum Crock for later or for traveling. ABOUT DEREK WOLF
Easy Camp Tacos Recipe: Make Any Day Taco Tuesday
Last weekend I got to take off with some friends on Sunday to go spend the evening on the Little North Fork of the Coeur d’Alene River in Idaho in a 1985 VW Westfalia. We hung out all afternoon, did some fly fishing with no luck, and found a little spot to settle about 15 miles up a windy dirt road along the river to make a meal and spend time with no distractions. Eating in the outdoors is something I really enjoy. I highly recommend making a meal outside and away from civilization once a week, it allows you slow down and enjoy everything as its happening without the distraction of your phone, work, and the general busyness of life. It wasn’t Taco Tuesday, but we still enjoyed an easy camp tacos recipe. When it comes to cooking while camping, it isn’t usually the most glamorous activity unless you have the right tools. Personally, I’ve had many nights of sausage over the fire with some s’ mores later on. Then there’s the back country. That’s an entirely different story. Those adventures usually consist of an MRE or another freeze-dried food equivalent. As of late, I’ve been more into camping with my family. The more I’ve gotten into car camping with my family, the more I’ve enjoyed actually cooking a real meal while in the woods. This form of camping may require a little more planning and extra space, but having outdoor meals with my loved ones makes it all worthwhile. Bonus points if it’s an easy camp tacos recipe. Before we get to the recipe, remember those essential tools I was talking about to make camp cooking a breeze? My Stanley cookware is a key player in that mix in making camp cooking super easy for my family and me. I always bring myfor any family camping trip. My favorite thing about this cook set is that it packs down so nicely.Inside of a 3.7 QT 18/8 steel pot, there are: 4 plates 4 bowls 4 sporks A spatula A ladle Frying pan Trivet Cutting board Drying Rack Oh, and did I mention that the lid to the pot is a vented lid, designed to be used as a strainer? Yep, the set is pretty damn fancy. Pro Tip: One thing I’ve noticed about the Stanley cookware is that char is definitely unavoidable. No matter how much oil I cook with I always end up with a little layer of black and a weathered pot/pan afterward. Now to me this is a non-issue, but in the woods cleaning them can be a bit tricky. I found that the best way to clean them on site was to run down to the river and toss some sand in the pot and run across it with a rock. This cleaned most everything off the surface and left minimal cleaning to do once I arrived back at home EASY CAMP TACOS RECIPE I’ve made all sorts of fun camping recipes with this gear but one of my go-to camping meals is a version of a taco. Tacos are a crowd pleaser and you can never go wrong with this simple, yet satisfying recipe. Ingredients: Ground meat of your choice Shredded lettuce Diced tomatoes Yellow onion Red Pepper Salsa Guacamole Tortillas (corn, flour, or you could even do a lettuce wrap to cut down on carbs) Taco Seasoning (This is an essential in my camp box along with salt, pepper, and hot sauce) Cooking oil New Column New Column  Easy Camp Tacos Cooking Directions: Season your ground meat with the taco seasoning. Then, add a little cooking oil to your steel pot and cook the ground meat until it’s browned. Chop your onion and peppers and sauté in the frying pan. After sautéing the veggies and browning the ground beef, tossed everything in the pot. Use the frying pan to warm your tortillas (optional step, but who likes a cold tortilla?) In a warm tortilla, place a scoop of ground meat & veggies, and garnish with lettuce, tomatoes, and guacamole.  Boom! Dinner Is Served! Now, get out there and make some food in the woods. You’ll thank me later. ABOUT GRAFTON I'm a #raddad, bicycle mechanic, photographer and lover of everything the Western US has to offer. You can find me on two wheels, skiing, or knee deep wading in the river. My hands are always greasy and I'll do whatever it takes to keep on playing in the dirt. 
Boozy Blueberry Tea: A Warm Winter Treat
In the winter months, it’s not uncommon to have negative temperature in South Dakota. In fact, it’s currently -34 degrees outside. I look for any opportunity to get outside, but even for an outdoorsman such as myself, it’s pretty hard to think about being active outdoors during these cold winter months. I’m not one for staying inside, that’s why I came up with a solution. A warm tea-based cocktail for those winter days that I like to call Boozy Blueberry Tea. I remember a few years ago my wife’s family and I were planning a New Year’s Eve afternoon picnic at a local park. Keep in mind, it’s pretty cold out here during that time of the year. My father in-law mentioned bringing along some blueberry tea to warm us up and I didn’t think too much about it. However, everyone seemed very excited about this, but I still had no idea what it was. Once I found out, I was hooked. Now I’ve made the Boozy Blueberry Tea one of my own signature cocktails for wintery weather. Before we move onto the recipe, I’m going to throw a curve ball at you. The interesting thing about this recipe is that there are no blueberries involved! I know, I know, you’re probably wondering why it would be called Boozy Blueberry Tea. We’ll get to that in a minute. BOOZY BLUEBERRY TEA RECIPE For Now, Let’s Get Into The Ingredients: 1-part Amaretto liqueur 1-part orange liqueur (Grand Marnier) 4-parts orange Pekoe Tea (to taste) This winter cocktail interestingly provides a warm reminiscence of blueberries. This is why I think this cocktail is great for activities such as picnics, winter walks, and cross-country skiing because you can add more pekoe tea and make it more of a warming drink than a cocktail. My wife and I recently brought along our favorite 25 oz Stanley Master Series Bottle filled with Boozy Blueberry Tea while cross country skiing with friends. This bottle is perfectly suited to slide into a small backpack and keep all of its content hot on a cold day. When I pulled out the bottle of Boozy Blueberry Tea, my friends didn’t think much about it. But once they took their first sip, their reaction was a lot like mine when I tried it for the first time. It was a great treat for everyone to share a nice warm drink half way through our afternoon ski. Next time you are looking to keep you and your friends warm when cross country skiing, or even when you come inside from an afternoon on the ski hill, be sure to fill your favorite Stanley with some Boozy Blueberry Tea. For more recipes and learn more about me and my outdoor advenutes, follow me on Instagram.   ABOUT NOLAN BERG I was born and raised in northwest Minnesota. From as early as I can remember I have always loved and lived the life of an outdoors man. Hiking and camping are a big part of my life, as well as trail running and of course, mountain biking. I love the destinations mountain biking can take you, as well as the speed and amount of area you can explore on a bike.
blog-recipes-wild-berry-spritz-with-muddled-wormwood
Wild Berry Spritz With Muddled Wormwood
To some Alaska is known as the last frontier, for others, it’s just the beginning. For the second season of Kitchen Unnecessary, we partnered with Seattle-based lifestyle influencer from the popular blog Not Without Salt to explore the culinary flavors that Alaska has to offer. Ashley and her crew traveled to a small town near the mouth of the Copper River called Cordova, which is known for its local fishing industry. While there, Ashley spent time with a local named Raven to find the freshest ingredients to craft a delicious meal with local ingredients. Ashley completed the meal with Wild Berry Spritz with Muddled Wormwood that she made in a Stanley Adventure Happy Hour Cocktail Shaker Set. Note: This simple cocktail can easily be adapted if you don’t happen to find yourself in Cordova, Alaska with access with wild wormwood and Raven’s homemade wild berry liquor. In lieu of wormwood muddle with a few rosemary leaves and in place of Raven’s liquor use a raspberry liqueur - or something similar. WILD BERRY SPRITZ WITH MUDDLED WORMWOOD Ingredients: A few Wormwood leaves 1/2 ounce berry liqueur 1/4 ounce fresh lemon juice Prosecco Directions: Add a few Wormwood leaves to the bottom of a cocktail shaker. With a muddler or the back of a wooden spoon gently press the leaves to help release some of the aromatic oils in the leaves. To that add ice, berry liqueur, and lemon juice. Shake vigorously. Pour in a glass then top with crisp prosecco or champagne. Garnish with lemon or more Wormwood.  
Quality Coffee For Winter Activities
When waking up early to go for a run, a quick rip on my mountain bike, camping next to a lake, there is nothing is better than hot fresh quality coffee. This is even more important during these frigid months of winter. I don’t like to slow down in the winter so I try to keep active and busy. One of the best ways to do this is to bring along hot coffee. This is the main reason I love to work with Stanley. They make the best products to make this possible. Whether you are snowshoeing, cross-country skiing, or just walking your dog through the park, there are a few ways to enjoy a great cup of coffee. The two most important steps to making great coffee whether you are at home or on an adventure; 1. Use freshly ground quality coffee 2. Use clean cold water. When I am in need of a large amount of coffee (maybe all for me) I always go for the Stanley Adventure Percolator 1.1 Qt. This thing makes amazing coffee if you have the room to bring it along. When using this percolator, you will need to bring along the water as well as a small stove. I recommend something like a Jet Boil or even a larger camp stove to brew your coffee alongside your morning breakfast. The percolator is an easy hands-off way to make coffee. All you do is fill up the basket with your favorite course ground coffee, fill the main compartment with water up to the fill line, then boil for 8-10 minutes. If you are hard-pressed for something a little more compact, I absolutely recommend the Stanley Mountain Vacuum Coffee System Bottle 1.1 Qt. This thing flat out does it all. It actually allows you to bring along your water and coffee grounds in this small package. The only thing that you need to bring along is a small Jet Boil Burner to heat your water. When completely torn apart, the system includes 2 cups, a coffee ground container, a vacuum bottle, and a pot with a coffee press! It’s amazing and probably my new favorite piece of camping gear. With this system you pour the water you had stored in the vacuum bottle into the pot and bring the water to a boil using your small stove. After your water is up to temp pour your grounds in from your container into the hot water and give it a good stir. After eagerly waiting about 5-8 minutes, press the coffee grounds and you are ready to enjoy a great cup of coffee! Lastly, if you are really in a squeeze for space, all you have to do is what Stanley does best. Bring along a vacuum bottle with your favorite pre-made coffee! The new Stanley Master Vacuum Bottle 1.4 Qt or even the Stanley Master Vacuum Mug 18 oz will keep your coffee hot all day long. The 1.4 Qt keeps your coffee hot for 40 hours! One of the biggest benefits of this is the fact that you can comfortably make your coffee in a familiar place in your kitchen. So, what I’m trying to say here is that the winter is no time to slow down. Getting outdoors in the winter months can be really enjoyable and a good way to help is to have freshly brewed coffee to keep to warm and moving! Keep up with my outdoor adventures by following me on Instagram.   ABOUT NOLAN BERG I was born and raised in northwest Minnesota. From as early as I can remember I have always loved and lived the life of an outdoorsman. Hiking and camping are a big part of my life, as well as trail running and of course, mountain biking. I love the destinations mountain biking can take you, as well as the speed and amount of area you can explore on a bike.
Camping Breakfast Recipe: Chipotle Egg Skillet
Here is the truth: some of the best meals you have ever eaten have not been from an indoor kitchen. That is right! We love food when it is cooked outside. The fresh breeze on your face and the crackling of the campfire are the perfect ambiance for a great meal. So then what is the reason that we choose not to cook outside more? The answer, we don’t have the right equipment. Cooking outside is one of the most rewarding culinary experiences that you can have, and yet having the right equipment is one of the most overlooked parts of the cook. Most often you are looking for lightweight equipment that is both durable and easy to clean. You want multi-purpose cooking pieces that can help you make breakfast, lunch, and dinner. Well, the answer is here! You need the Stanley Base Camp Cook Set. My favorite dish to cook outside is breakfast. Nothing beats a skillet full of eggs and carbs over fire. I brought my new Stanley Base Camp Cook Set out to the lake for the weekend to test it out and see if it could handle my rugged cooking style. It definitely could. Firstly, it comes with tons of equipment that fit perfectly inside of a 3.7 qt pot. You have a skillet, utensils, spatulas, plates, bowls, dish rack, heat resistant trivet and a cutting board. This compact cooking maven is ready to handle all your over the campfire experiences. If you are going to test this bad boy out, then you need to try my new Chipotle Egg Skillet recipe below. This spicy and sweet skillet will fill you up with all the necessary calories to take on a day of adventure. Just make sure to pack your Stanley Base Camp Cook Set! CAMPING BREAKFAST RECIPE: CHIPOTLE EGG SKILLET Cooking Details Yields: 1-2 Servings Prep: 5 minutes Cook: 15 minutes Equipment: Stanley Base Camp Cook Set   Chipotle Egg Skillet Ingredients 2 fresh eggs 1 cup of hash browns 1/2 cup of bacon (chopped) 3 tbsp. of butter 1 tbsp. of paprika 1 tbsp. of brown sugar 1/2 tbsp. of chipotle powder 1/2 tbsp. of sea salt Cilantro (Optional) Instructions Using charcoal or wood, safely create a fire for direct grilling. From your Stanley Base Camp Cook Set, pull out the skillet, spatula, and cover. Add skillet to fire and preheat for 2 minutes. Add butter to skillet and let melt. Once melted add hash browns and let cook for 3-4 minutes. Push hash browns to one side of skillet and add bacon to other side. Let bacon brown. After both bacon and hash browns have browned, add all seasonings above. Mix seasonings, hash browns, and bacon. Let cook for 2-3 more minutes. Create a hole in the middle of the skillet, add more butter if the pan is dry and crack your two eggs into the hole. Cover with lid and cook to your desired preference. Pull skillet off the fire, top with cilantro and serve! For more recipes by Derek Wolf, visit OverTheFireCooking.com.     ABOUT DEREK WOLF I am the cook & creator behind Over The Fire Cooking. I love traveling the world and being inspired by how fire, food, and people come together. 
3 Gourmet Shellfish Recipes To Prepare In The Great Outdoors
When we think of outdoor cooking, it’s easy for things like hot dogs and canned beans to pop into our head. Sure, these meals put something in your belly, but they leave your taste buds craving for more. Just because you choose to trade your in your modern digs in for the beauty of the great outdoors, doesn’t mean you have to sacrifice on the quality of the food you eat. In fact, it’s a great opportunity to up your cooking game and try your hand at gourmet cooking.  In episode two of Not Without Salt, blogger and cooking extraordinaire Ashley Rodriguez shared several recipes from her late-night shell fishing adventure in Olympia, Washington. After combing the beach for hours, Ashley gathered fresh ingredients such as oysters and clams, she packed them in her Adventure Cooler and headed up the beach. Here is where she created an outdoor kitchen, featuring the Adventure Base Camp Cook Set. Ashley worked her magic and created a fine menu of options, complete with a boozy beverage.   Smoked Clam Carbonara  While far from the classic this carbonara is quite possibly the most satisfying meal by the fire. Clams slowly steam and smoke by the fire scented with the residual bacon and garlic cooked in the same pan. Eggs and Parmesan miraculously submit into a creamy sauce with the help of a bit of heat the starchy water that the pasta cooked in. Finished with a bit of lemon for brightness, parsley for color and freshness and even more cheese - no explanation needed. Serving Size: 4 to 6 6 ounces/170 g pancetta or bacon cut into 1/2 -inch strips 4 garlic cloves, thinly sliced 1 pound/ 450 g spaghetti or bucatini Sea salt 1 cup/20 g Parmesan, grated, plus more to finish 3 large eggs 1 teaspoon freshly cracked black pepper, plus more to finish 2 teaspoons finely grated lemon zest, plus more to finish 3 tablespoons fresh lemon juice 1 lb clams, scrubbed clean 1/4 cup roughly chopped Italian parsley to finish Add enough water to fill a large dutch oven or stock pot up halfway then stir in enough salt to make the water taste of the sea. Bring this to a boil. While the water comes to a boil, crisp up the pancetta in a large skillet, about 5 to 7 minutes. Add the garlic and cook until golden and crisp, about 3 to 4 minutes. Remove the bacon and garlic to a plate. Add the clams to the same skillet the bacon and garlic cooked in. Set the pan over the coals for 1 minute while stirring to coat the clams in the residual grease. Set the pan off to the side of the coals yet still close to the fire. They’ll slowly start to open and take on some of that luscious smoke. Cook the pasta until al dente, about 10 to 12 minutes. In a large bowl stir together the Parmesan, eggs, and black pepper until thoroughly combined. Add the hot noodles directly to the egg mixture and stir well and quickly so as not to cook the eggs. Add a bit of the pasta water as needed to create a creamy sauce. To the pasta add the bacon, garlic, and clams then stir in the lemon zest and juice. Transfer the pasta to a serving platter then top with more grated Parmesan, lemon zest, black pepper, and Parsley. Raw Oysters With Lemony Dill Oil And Percornio It’s a bit intimidating preparing shellfish dishes for the people who have dedicated their lives to raising some of the best shellfish around. But I could not have been more pleased (and perhaps even a bit surprised) with how delicious this combination is. The stunning emerald oil pools in the oyster shell creating a sea of green along with the salty brine. A flurry of Pecorino adds a creamy richness that cuts through the acidity and brininess beautifully. Serving Size: 4 to 6 1 small bunch Dill, stemmed removed, torn 1 small garlic clove Zest of one lemon ¼ cup olive oil 2 tablespoons fresh lemon juice Pecorino, finely grated 1 dozen oysters, raw, on the half shell. Add dill, garlic and lemon zest to a mortar and pestle or small food processor. Crush or process until finely chopped. Stir in the lemon juice then stream in olive oil. This oil can be made ahead and brought to the fire. Top each oyster with a teaspoon of the dill oil and grate pecorino over. Spicy Tequila Oyster Shooters Besides sitting near the warmth of the embers I can think of no better way to warm up after a midnight shellfish adventure. Served straight in the shell you can leave the space in your backpack you would have taken up to pack glassware for more tequila. Serving Size: Makes 8 oyster shooters 1 slice jalapeno 2 slices cucumber 5 mint leaves 2 oz tequila 1 lime, cut into wedges 8 oysters, shucked but kept in the shell Add the jalapeno, cucumber slices, and mint leaves to the bottom of a Stanley cocktail shaker. Gently muddle until the ingredients are lightly crushed and fragrant. Fill the shaker with ice, and add the tequila. Replace the lid then shake vigorously. Pour about 1/4 ounce over each oyster then finish with a squeeze of lime. Serve straightaway. 
Stanley Boozy Favorites: Bourbon Bacon Maple Oatmeal
Picture this: You and a cadre of your best buds wake up bright and early after a long night of camping out at big outdoor music festival/art extravaganza/all-out-party. This whole weekend has been a blur as you listen to music, build bonfires, and carouse the night away. Maybe Jay brought along a bottle of fine aged bourbon that got passed around. Why the hell not - that’s what getaways like these are for, right? This morning, though, as you unzip your sleeping back, stretch and stumble out of your tent, all that carousing has caught up with you. The cool morning air and grass between your toes is helping, but you need something warm and hearty to help you nurse your party wounds. Something with the right mix of sweet, spice, salt, and fat that is the key to all good hangover cures. Maybe even something that features a little hair of the dog, just to even things out and help the day get started. And, most importantly: Something you can make in a single mobile cook set, like the Stanley Adventure Series Base Camp. Friend: Stanley’s got you covered. Our Bourbon Bacon Maple Oatmeal is the perfect post-party panacea, ready to bring you and your compatriots back to life in a pinch. Ready to taste the magic? Read on, young buck: Bourbon Bacon Maple Oatmeal Servings: 6-8 hungry peeps Ingredients: 2 cups of water 2 cups milk (or your favorite milk substitute) 2 cups of rolled oats - NOT instant oats, the real stuff. If you’re not down with the gluten, there are plenty of gluten-free options. 2 tsp cinnamon 2 tsp minced ginger 2 tsp vanilla extract 4 tbsp Bourbon Barreled Maple Syrup (or plain maple syrup if you’re not feelin’ fancy) 2 shots of your favorite whiskey (and one shot for yourself) 2 pinches of salt (we love the Sea Salt, but anything from that pink stuff from the Himalayas to a dash of Morton's will work just as well) 4 - 8 slices of bacon, fried to a nice maple brown color but not brittle The How To: Fry up your bacon in a saucepan. Be sure to wear pants, no matter how convinced you are there’s no one around to judge. Last thing you want is to have to explain how you got burned by bacon grease down there. Fill a large pot with your water and milk and get it boiling either over a campfire or gas-powered camp stove. Once it's boiling, add your rolled oats. Add your ginger, cinnamon, vanilla, and maple syrup. Add in your whiskey. Don’t sweat getting exactly two shots worth, just make sure it’s still more oats than booze when you're done. Slug or sip your shot of bourbon. You’re the chef, no one gets to tell you it’s too early. Stir it up, and let it cook down for about 10 minutes until it reaches your desired consistency. Stir every few minutes. When the oats are done, give it a good stir. Serve immediately, garnished with the bacon. Add a dash of maple syrup if you got a sweet tooth. That’s it! Ten minutes and you’ve got yourself a hell of a belly coater with the right touch of sweet whiskey bite. You can tweak the recipe however you want, add in some berries for sweetness or mix in nuts and granola for crunch. If you can’t finish it all, toss what’s left in a Stanley Bowl and enjoy warm oatmeal and bacon for hours. Food like this deserves a toast… If you still have any whiskey left.     ABOUT STANLEY The Stanley brand has a rich 100+ year history. Born from inventor William Stanley Jr. who forever changed the way hot drinks were consumed, in 1913 he fused vacuum insulation and the strength of steel in one portable bottle, inventing the all-steel vacuum bottle we know and love today.